Author Topic: My 1st Winter Village (In Progress)  (Read 2470 times)

MitchO

  • Registered LUG Members
  • Full Member
  • *
  • Posts: 117
My 1st Winter Village (In Progress)
« on: September 22, 2022, 11:10:53 am »
I had put a thread in General asking about elevated platforms (thank you for the suggestions!), but as this thing grows way out of control, my parts inventory and level of expertise, I figured there was enough to put together a thread of the pictures of what I have so far.  Right now, the plan is 5.5 plates by 2 plates, 8 diff MILS plates overall, and I'm already running out of room for all the Winter Village buildings I have but still ... I'm very happy with how it's going overall, especially considering this is the first MOC style I'm doing and I've clearly bitten off more than I should. :)


Here's the overall set up as it currently stands.  The three green plates have not been started, and the mostly red wide part behind the train station is my "town square" in progress (think the multiple elevations, statues and stairs in front of the NYC main library). 


Santa's Workshop and base was mostly built so I had a feel for how short I was going to be on my tall light grey pieces. It will eventually mirror the back right in structure, and I need to still landscape and clean up the area (the Workshop needs to go back a couple studs and I will be making room for the toy making assembly line in front).  The plate to the right of this will eventually be the Gingerbread House, which we haven't even built yet.


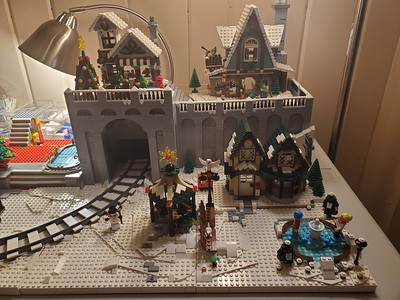
The back right is 95% of the way done; the two plates are one 32x64 MILS plate to allow for the platform and wall to stay together.  I don't have a good picture of the detailing yet, but i have 2x2 light grey for the front, and white angled plates overlapping onto that for the snow, plus a caroling group being photographed, some Elves admiring their work outside the toy store.

The front two plates can be separated and are "intially done"; I'm not satisfied with my limited usage of the angle plates to give some landscaping.  The Post Office is elevated one round of masonry bricks, but I ended up just doing it on the plates that it's built on (I have a shortage of 4x4 whites).  If you aren't familiar with the pond on the right corner, it has gears sticking out that allows those two skaters rotate and circle around the pond; I'm pretty happy with how I managed to keep that mechanic exposed on the side of the MILS plate.  The gazebo, benches, and/or little stand may move to my town square, but I'm already running out of room there.  If enough of them move, I'll have room for Santa's Visit here.


The back opening of the Train Station is a little weird ... I have it backed up to my town square, but "realistically" I can't just have the walkways lead to the back, as it would lead my minifigs right into the coffee shop and ticket booth :P  I also went *nuts* doing the math on getting the train track properly connected to go to the tunnel (which will have a mirror on the other side) ... because of where it's placed on the right side, the middle needs to actually be 32x52 ...  i'm using 16x16 and 6x8 plates to extended that MILS plate, but I didn't realize they are a different thickness than actual base plates.  Do I have to cut 32x32 baseplates to make a custom size like this?


I also need to do some math on the best way to break up my stairs, and I think my main, wide area needs to be 2 steps higher so it's more visible behind the train station.  Currently the plan is to have the main area go as far back as those little extra stairs sit ... then those stairs will stop at the small platform shown, and branch off left and right to meet the other plates.  Again ... not enough parts, not enough space, etc.  This area in general will also need a lot of little changes to make it look good, rather than just generic square brick building.

Any suggestions, ideas (or brick donations ;D) welcome!

Doodlebug

  • Registered LUG Members
  • Full Member
  • *
  • Posts: 182
  • Illegitimi non carborundum
Re: My 1st Winter Village (In Progress)
« Reply #1 on: September 22, 2022, 04:15:00 pm »
I think you are going to end up cutting baseplates. There are 16x32 baseplates, but that is not going to solve your problem. There are also some 14x20's.
Before you get too far, are you going to get the light kits available. To add them after assembly is not too difficult. I personally think the lights are too bright, but they do add a nice touch.

MitchO

  • Registered LUG Members
  • Full Member
  • *
  • Posts: 117
Re: My 1st Winter Village (In Progress)
« Reply #2 on: September 22, 2022, 07:37:51 pm »
I think you are going to end up cutting baseplates. There are 16x32 baseplates, but that is not going to solve your problem. There are also some 14x20's.
Before you get too far, are you going to get the light kits available. To add them after assembly is not too difficult. I personally think the lights are too bright, but they do add a nice touch.

No, I've already spent so much on the parts of this, I can't even consider investing in lights right now.

legoweeble

  • Registered LUG Members
  • Full Member
  • *
  • Posts: 214
Re: My 1st Winter Village (In Progress)
« Reply #3 on: September 24, 2022, 07:56:01 am »
Thankfully, cutting baseplates is not that difficult - I've done it at the store to replace the ones that had been the play areas of the long-lost (and unloved) computer/build kiosk.
*Most important is to make sure you are cutting straight - I've used Megablech for that purpose because it is expendable in case of blade slippage or other nefarious acts. :D
*Line up the bricks where you wish to make your cut, then score along them multiple times - I would start with a lighter pass to get it right, then somewhat heavier once the line is made.
*Once scored, you can snap the baseplate along the scoring and clean up the edges with sandpaper, a file, etc. and if desired, make the corners less pointy by snipping them off at a 45 degree angle like LEGO does on its molded edges.

I hope this helps somewhat - please ask questions if something is unclear or you want more info. - Jenny

MitchO

  • Registered LUG Members
  • Full Member
  • *
  • Posts: 117
Re: My 1st Winter Village (In Progress)
« Reply #4 on: September 26, 2022, 09:48:14 am »
Thankfully, cutting baseplates is not that difficult ...

Thanks Jenny ... I bit the bullet this weekend and cut two 22x36 plates.   I didn't even have to smooth it down very much since I was able to have the cut side facing inward on the combined MILS  plate.  It def. made a noticeable difference in keeping things better locked together.  Now if only I can consistently get plates to fully stay down on top of each other and not bubble up on occasion ...  ;D

Overall update:

Finding stairs, masonry and large window pieces on the PAB wall this weekend also helped me make a big step forward in overall progress ...  I'm slowly getting to the point where I can only do little things with my current part inventory.  I'm going to need a bunch more 1x2x5 Light Grey (or a *ton* more equivalent 1x2 Light Grey brick in general), as well as telescope/bannister pieces,  to do the remaining upper platform piece (the Gingerbread House, which will be between Santa's Workshop and Town Square).  And despite buying a bunch of 6x8 White plate, I probably still need a decent amount more of 4x4 White plate for individual areas.  I originally bought a LOT of 4x5 Red, since I figured it'd be covered by the white or grey along the way and it was a fair amount cheaper than White or Light Grey, but I'm really regretting that ... I find that the number of places I can "safely" use the red and have it not showing are limited.  Someday I'll have to make a Mars or Volcano scene or something, lol. 


Thanks to the stair elements, Town Square has it's basic initial setup complete.  In addition to needing bannisters and walls to cover up the support, I also need more color.  I tried to do some small mountain-ish slopes (you can see the one column of white on either side of the center stairs), but just don't have the right combo of pieces imo. And for my largest piece (52x32), I still find myself not really having enough room to do everything I want;  I was considering moving the gazebo here, and I only managed to fit like 2 gifts under the tree (it has a wide, low footprint).  I'm also eyeing more light grey minifig parts like the fireman statue on the rink, to make another statue or two around this park.


And as I mentioned last time, I moved the Workshop back to make room for some additional stuff ... the toy making assembly line machine is overheating and spitting out toys faster than the Elves can handle!  ;D  It's amazing how many little mini builds of toys, gifts, etc you accumulate with all the Winter Village sets, I think this isn't even a third of them overall, and I swear that 75% of them are mini planes, helicopters, trucks, etc.


Plus thanks to the large window elements I picked up, I have a first draft on Santa's sleigh launching for the night.  When the entire piece comes together, this is where an Elf (from the Clubhouse) is watching from his telescope on the perch, to make sure everything went off properly.  This still needs work, as I want to make it more stable; I have to find the balance between support bricks underneath without them being visible from the front.

« Last Edit: September 26, 2022, 09:50:09 am by MitchO »

MitchO

  • Registered LUG Members
  • Full Member
  • *
  • Posts: 117
Re: My 1st Winter Village (In Progress)
« Reply #5 on: September 26, 2022, 09:59:27 am »
I don't get how this forum seems to be nitpicky about photos, just realizing that I'm only having the small versions that you can't click on, so for the record, the full album:

https://www.flickr.com/photos/196428048@N03/albums/72177720302427973

MitchO

  • Registered LUG Members
  • Full Member
  • *
  • Posts: 117
Re: My 1st Winter Village (In Progress)
« Reply #6 on: October 01, 2022, 10:11:59 pm »
Really starting to get to a point where you can see the whole thing ...


Just barely enough bricks left over to do all the remaining supports, and I used every last 1x2x5 I could find to finish the other tunnel.  I'll have to figure something out to fill in the walls for the stairs.  Just gotta install the fireplace and bakery onto their plates plus landscaping for those two, plus build the gingerbread house for the open slot on the top.  But first time all 10 plates are kind of together and it feels good to see the massive thing taking shape.

MitchO

  • Registered LUG Members
  • Full Member
  • *
  • Posts: 117
Re: My 1st Winter Village (In Progress)
« Reply #7 on: October 12, 2022, 10:37:16 am »
Rearranged the stairs again, I just wanted to try to find a placement that didn't waste a bunch of stuff but also gave me a proper path upward, as well as being able to end on a forward overhang; the buildings on either side of this module are on the back, so ending the stairs there will put my figs into a wall.  I kinda built myself into a corner this way; in hindsight, I may have changed the size of this so that there were just large staircases along the outer edges.  But I've got a much more robust and fuller set up for the stairs, and added some color and detail.  I'm particularly happy with my "Angel Delivering Fire" stone statue.


MitchO

  • Registered LUG Members
  • Full Member
  • *
  • Posts: 117
Re: My 1st Winter Village (In Progress)
« Reply #8 on: October 23, 2022, 05:34:54 pm »
Been a while since I've updated, but I have a bunch of changes.

20221023_162657

Moved the Bakery up, as there wasn't enough room on the upper level for the Gingerbread House.  Then I ended up moving the Post Office into that spot and the Gingerbread House back into the corner, for a bit more space around the train tracks on that side.  Felt too imbalanced.  I gotta go back and decide if/how I can cover up the red plates and multicolor walls inside the tunnels; I used the black and grey that used to be in there to finish more visible walls and such.

20221023_162723

Finished up the full plan for this set up of Town Square.  Still feel like it could have a better overall plan, but this allowed me some various personal touches on the lower level while still setting up the top stairs to land on proper places for the upper level.  Also still need to decide if there's a better way to transition from the back of the Train Station to the Town Square steps.  Open for suggestions.

20221023_162706

Have open spaces in front of the Fire House and behind the Post Office, but not large enough for another actual building.  I still had 4 full sized vehicles, so I put in the road in, but it feels like I'm still learning how to properly do the snow edges.  Both ends of the road also just kinda end abruptly.

20221023_162715

And started a walking path out of the Fire House to behind the Post Office, to add a little scene of someone filling up the horse & carriage with gifts.  Want to make sort of a parking lot area there, but not sure if I have the space to do it properly.

20221023_162734

Pretty satisfied (again) with the setup on this side.  Had to reduce the landscaping and hill around the gazebo, but there's enough activity around here to make it OK.  Love my guy stuck in the snow.  ;D

Feel like I'm slowing down as I get near the limit of things I can do without ripping it apart to do more major changes, and it's already nearing the limits of how much space I can dedicate to the Village when it's actually out for the holidays.  But more sets being added every year and more things I wanna do!

Doodlebug

  • Registered LUG Members
  • Full Member
  • *
  • Posts: 182
  • Illegitimi non carborundum
Re: My 1st Winter Village (In Progress)
« Reply #9 on: October 23, 2022, 07:10:14 pm »
I like the cobblestone road.
As to the tunnels, without lighting how noticeable is the Red? Hang a piece of black paper inside.
What about some small bushes to hide the hard edges at the bottom of the Gray walls.

MitchO

  • Registered LUG Members
  • Full Member
  • *
  • Posts: 117
Re: My 1st Winter Village (In Progress)
« Reply #10 on: December 11, 2022, 06:02:06 pm »
Well, I knew I couldn't do that much more without ripping it apart and risking missing the holidays, so here it is in all it's first year glory:


I'm hoping next year to move the tunnels to the outer edges and see if I can do the train with an extra half baseplate around the edges, so it doesn't interfere with placing buildings so much.  Thanks for all the help and suggestions through the first iteration, here's to bigger and better and always building!

robzicc303

  • Registered LUG Members
  • Full Member
  • *
  • Posts: 167
Re: My 1st Winter Village (In Progress)
« Reply #11 on: December 11, 2022, 08:38:17 pm »
Nice job!

RickE

  • Registered LUG Members
  • Full Member
  • *
  • Posts: 119
Re: My 1st Winter Village (In Progress)
« Reply #12 on: December 12, 2022, 01:24:14 pm »
Nice!

CP5670

  • Registered LUG Members
  • Full Member
  • *
  • Posts: 122
Re: My 1st Winter Village (In Progress)
« Reply #13 on: December 12, 2022, 10:53:21 pm »
This has come along very nicely, I especially like the tunnel arches and the reliefs around them.